Tool Holder directions (Page 2 of 2):
Now, to make a Gun Carriage; Take a "set" of two axle trees .450" wide, two axle trees .508" wide, and two cheeks. Note: Since the Gun Carriage is narrower at the front, I calculated the angle and
came up with one degree and thirty five minutes. When applied to the thickness of the
axle trees where they contact the angled cheeks, there is a taper of .0022" along the
.085" thickness. A small amount, but I did sand it in. No unsightly gaps for me! Better
glue job/joint that way.... One cheek is placed against the containing outboard pins. The axle trees are
placed between the pins to locate them. Use a squared off ice cream stick to gently
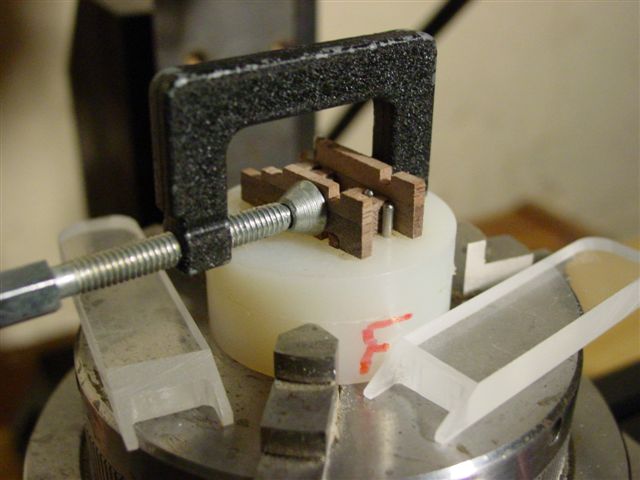
nudge the axle trees into place against the cheek. Axle trees in position in Assembly Fixture; Using an artist's brush, apply glue to the vertical surface of the axle trees and
the underside of the inverted T.
The second cheek is then put inside the outboard locating pins. A really good
fixture , which I like to think this is, also acts as a filter to exclude bad parts. If
they are too thick, they will not go into the space between the pins.
If they are too small, they are already sitting in my reject bin, having been
weeded out as I made them.
I use a Drop Dial Indicator to measure the .085" thickness. Cheeks added to Assembly Fixture; After the glue is applied, use a small C clamp to hold the assembly together
until the glue sets. Two plastic extraction forks in foreground; After the glue is set, remove the
finished Gun Carriage. To do it safely, make two plastic extraction forks.... using the principle of the
inclined plane.....
Note; Anoint the pins with a mold release ( thin grease) to prevent the glue
from sticking to the pins and carriage parts.