| Paint Mixer | ||
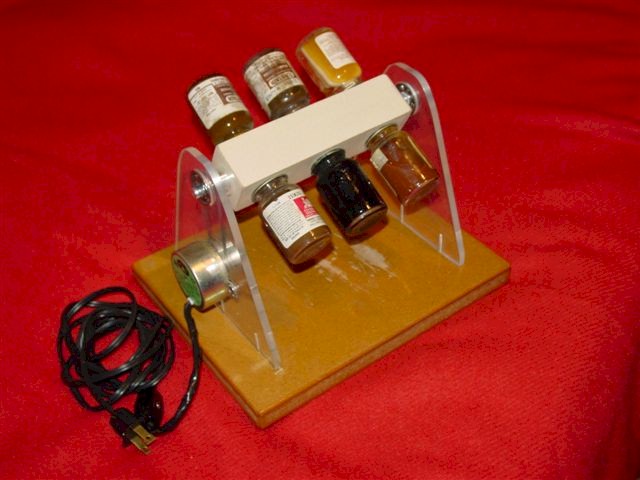 |
Paint Mixer directions: Sides Now, peel the paper off from both sides. If it peels off easily, now cut two pieces 1/4" by 6" + by 6" +. I say + because you will want to leave a little extra material to bring the sides to size. 1/16" is fine. Now, bring the two sides to 6" by 6" Square. A good way to do this is to clamp them together, and treat them as one piece. Mill them together. If you do not have a milling machine, get friendly with the owner of a nearby machine shop. :) Or a friend who has a milling machine. You
can do it by hand also with a file and a good square. Now, you want to
put the holes in the sides that will accommodate the bearings and the
motor mounting and the mounting screw holes for the side themselves. Use
the masking tape locator as in the base. You have to fit it up so it is a fairly heavy push fit by hand. Next, the hole for the motor shaft to fit through the side. This hole is located on the centerline of the side at 3" from Y and 2 1/2" from X. It is to be drilled to 5/16" Diameter. Go through the stacked sides in case you ever want to mount the motor on either side.Now, we have to provide threaded holes for the motor mounting. There are two, drilled and tapped in the side(s), relative to the 5/16" clearance hole for the motor shaft.The first one is 2" from X and 1 7/8" from Y. Just drill a hole that is the tap drill for the 8 -32 screws for the motor. Go through both plates (sides). They
will be tapped later after the sides are separated. The size is # 29 (.136"
Diameter.)The second motor mounting hole is 2" from X and 4 1/8"
from Y. Also # 29 (.136" Diameter) Through both plates (sides).
Now, we have to turn the stack of two sides so that X is on top. We have
to drill the side mounting screw holes into what will be the bottom of
the sides. A caution here. Even though I called the Plastic sides (Lucite,Plexiglas)
1/4", there is always a tolerance. Take the sample we peeled the masking paper from, and measure the thickness with a micrometer or caliper. Don't have a micrometer or caliper? Go back to your friend or the owner of the machine shop. :) Divide
that measurement in half and you will have the location where the holes
have to be.From here on known as the C/L. Now, separate the sides by removing
the clamp(s). Have the X tape up and peel enough of the masking paper
away so you expose both The second hole is located on the C/L of the width of the side and 3" from Y The third hole is located on the C/L of the width of the side and 5" from Y. For the plastic drilling, use a slow RPM, use a mixture of soap and water or liquid soap for lubrication. For tapping, use a new sharp tap.(6 - 32) Go very slowly. The major cause of breakage of taps is the tap not being perpendicular to the surface you are tapping. And another thing is chips clogging the tap. Back it out and go a little deeper at a time frequently. You
can also tap the sides for the 8 - 32 Mounting Screws for the motor now.
"Make Haste Slowly". Put the sides on the side (haha)
for now. We will shape them later. You can wash them with warm water and
soap but don't rub them or dry them with |
|
| 1 2 3 4 | Next>> |